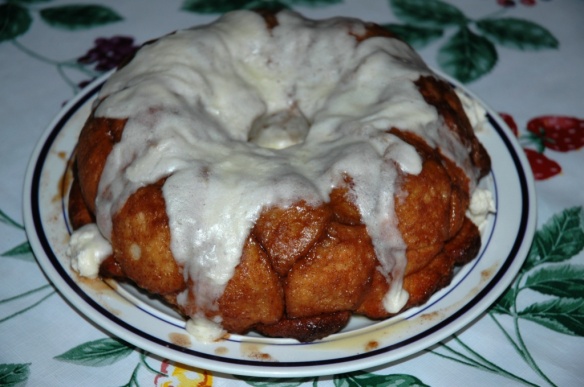
Gingered Monkey Bread | Bakewell Junction
It’s time for the ninth week of 12 Weeks of Christmas Treats blog hop. It’s hosted by Brenda Thompson from MealPlanningMagic.com. The blog hop goes live every Wednesday until Christmas. If you’d like to join us, please fill out the form on Brenda’s blog.
This is the ninth week of Christmas Treats. This recipe combines the #TwelveLoaves and #12WksXmasTreats. Since the theme for Twelve Loaves November is spice and I wanted to make something I’ve never made before, I looked for a Monkey Bread recipe. Monkey Bread usually has cinnamon but I thought it would be more seasonal for a gingery version. Plus I added a twist with mascarpone icing instead of cream cheese icing and lightly echoed the spice flavors in the icing. This Gingered Monkey Bread would be great for breakfast, brunch or dessert for your holiday table. If you like super gooey and sweet treats, this one is for you.
Gingered Monkey Bread
Yield: 6 to 8 servings Cook Time: 35 minutes
Ingredients:
Dough:
- 2 tablespoons melted butter
- 1 cup milk, warmed to 110 degrees
- 1/2 cup water, warmed to 110 degrees
- 1/4 cup sugar
- 2 1/4 teaspoons instant yeast
- 3 1/4 cups flour, plus extra for work surface
- 2 teaspoons salt
Coating:
- 1 to 1 1/2 packed brown sugar (I used 1 1/2 cups)
- 3 teaspoons ground ginger
- 1 1/2 teaspoons ground cinnamon
- 1/4 teaspoons ground cloves
- 8 to 12 tablespoons (1 to 1 1/2 sticks) butter (I used 1 1/2 sticks)
Icing:
- 4 ounces mascarpone cheese, softened
- 4 tablespoons (1/2 stick) butter, softened
- 1 1/2 cups powdered sugar
- 1 teaspoon vanilla extract
- 1/4 teaspoon ground ginger
- 1/4 teaspoon ground cinnamon
- 3 or more teaspoons milk
Directions:
Step 1: For the Dough: Mix the milk, water, melted butter, sugar and yeast in a two cup measure. I used a microwave safe glass measure and heated the milk and water at full power for 1 minute, 20 seconds to reach 110 degrees. In the bowl of a stand mixer, add the flour and salt. Using the dough hook attachment, start the mixer on low. Add the milk mixture slowly. Scrape down the sides as needed until the flour is incorporated. Increase the mixer speed to medium (raised my KA to the 5 setting) and let it knead for another 6 to 7 minutes. If the dough looks overly wet, add 2 tablespoons of flour at a time and continue mixing until the dough forms a mass. Spray a large bowl with cooking spray. Transfer the dough to the bowl and spray the dough also. Cover the bowl with a clean dish towel and use my tip below to aid the rise. Let the dough rise until doubled. If using my tip, it will double in 45 to 60 minutes. If not, it may take 1 to 2 hours.
Step 2: For the coating: As the dough rises, combine the brown sugar, ginger, cinnamon and cloves in a bowl. Place the melted butter in a small bowl. If you would like to dial back the sweetness and gooeyness of the recipe, use the lesser amounts of sugar and butter. Set aside.
Step 3: For the shaping the dough balls: Sprinkle a clean work surface with flour. Transfer the dough onto the floured surface. Spread and press the dough into about an 8 inch square. Cut the dough into 8 by 8 slices with a bench scraper or knife. This will give you 64 pieces.
Step 4: Spray the bundt pan with cooking spray. Roll each piece of dough into a ball shape. Dip each dough ball into the melted butter individually. Then roll them in the brown sugar mixture until they are well coated. Place the dough ball into the bundt pan. Layer the dough balls so they are offset and the dough ball on top is placed on the seam of dough balls below. Repeat until all the dough balls are in the bundt pan. If there’s any remaining melted butter or brown sugar, set aside.
Step 5: Cover the bundt pan with a clean dish cloth or plastic wrap. Let rise until puffy and until they are about an inch or two from the top of the pan. If using my oven tip below, let rise for 45 minutes. If not, let rise for 1 to 2 hours. If there’s any remaining melted butter, drizzle it over the top of the dough balls. If there’s any remaining brown sugar, sprinkle it over the top of the dough balls too.
Step 6: Bake unwrapped 30 to 35 minutes in a preheated 350 degree oven. When done the top should be browned and the coating begins bubbling a bit. Let bread cool in the pan for a maximum of 5 minutes. Any longer and it will be difficult to depan. Invert bread onto a large plate.
Step 7: For the Icing: While the doughs cools a bit, add butter and mascarpone cheese to a large mixing bowl. Beat 4 to 5 minutes. I beat them on high using a hand-held mixer. Beat in vanilla extract, ginger and cinnamon. Mix in the powdered sugar at a lower speed (this prevents having powdered sugar everywhere). Mix in the milk. If you want a thinner icing, add more milk in teaspoons increments until you reach desired consistency. While the bread is still warm, spread the icing on top of the bread – the icing will drizzle down the sides of the dough. Serve warm or cold.
Recipe inspired by Cooks Illustrated.
Tips: If your house is chilly like mine always is and your dough doesn’t rise, you can boil a pot of water while preparing the dough and place the water and dough in a cold oven. The boiling water will create a warm moist environment in the oven for the dough to rise well. Leave the oven light on and it will add to the warming effect.

12 Weeks of Christmas Treats Blog Hop
Week 9, November 20, 2013
Powered by Linky Tools
Click here to enter your link and view this Linky Tools list…
************************************************************************
#TwelveLoaves November-Spice. October #TwelveLoaves was about baking with Root Vegetables. It was quite a delicious month! Temperatures are dropping and it is the right moment to explore bread and SPICE! Share your November Spice Bread (yeast or quick bread). Let’s get baking!
If you’d like to add your bread to the collection with the Linky Tool this month, here’s what you need to do!
1. When you post your Twelve Loaves bread on your blog, make sure that you mention the Twelve Loaves challenge in your blog post; this helps us to get more members as well as share everyone’s posts. Please make sure that your bread is inspired by the theme!
2. Please link your post to the linky tool at the bottom of my blog. It must be a bread baked to the Twelve Loaves theme.
3. Have your Twelve Loaves bread that you baked this November, 2013, and posted on your blog by November 30, 2013.
#TwelveLoaves is a monthly bread baking party created by Lora from Cake Duchess. #TwelveLoaves runs so smoothly thanks to the help of the lovely Paula from Vintage Kitchen Notes and Renee from Magnolia Days.

Are you hungry for amazing bread? Check out what the Twelve Loaves bakers have created this month:
You are next… Click here to enter
This post may also be entered in these linky parties. Click the here to visit the other great posts in the blog hops.
Thanks so much for telling your friends about this post:


 Enjoy!
 Colorful Candy Bar Cookies