Valentine’s Toffee

I can’t believe January is already gone.  The hubby and I have been fighting colds all month (he gave me his cold).  It seems we get something this time of year every year.  Oh, well…

Do you want to make something special for your Valentine?  Why not make some delicious Valentine’s Toffee.  I would eat the entire batch in one sitting but I can’t let myself eat that much butter at one time.

Valentine's Toffee | Bakewell Junction - you can't stop eating piece after piece.

Valentine’s Toffee | Bakewell Junction

Continue reading

Cucidati – Italian Fig Cookies

How was everyone’s New Year’s?

I hope you’ll indulge one more Christmas cookie recipe.  Cucidati is a Sicilian cookie that I’ve only had once or twice.  I’ve also seen these called Italian Fig Cookies or Buccellati.  This cookie isn’t one of our traditions but it’s definitely worthy of anyone’s traditions or any special occasion.  My friend Chris makes these every year for her family and she advised that the recipe is from Gourmet and can be found on Epicurius.com.

Cucidati or Italian Fig Cookies | Bakewell Junction

Cucidati or Italian Fig Cookies | Bakewell Junction

Continue reading

Colorful Candy Bar Cookies

Want an easy Christmas cookie recipe?  Try this Colorful Candy Bar Cookie recipe.  These are sweet and have a candy surprise in the center.  I’m not generally a fan of Snickers bars but they worked well in the cookie.  I’m sure this would work with any  candy bar.

Colorful Candy Bar Cookies | Bakewell Junction - sweet and yummy for your Christmas baking.

Colorful Candy Bar Cookies | Bakewell Junction

This is my first time joining the Annual Christmas Cookie Recipe Swap hosted by Julie from White Lights on Wednesday.  Be sure to visit Julie to see all the other great recipes.  You can also find all the other cookies here.  Many thanks for hosting, Julie.

I was paired with Laura from Pink Cake Plate.  Her blog has great recipes and I’m thrilled to be paired with her.  Laura makes these cookies for her Christmas baking and now I’m making them too.

Christmas Cookie Recipe Swap | Bakewell JunctionEnjoy!

Colorful Candy Bar Cookies | Bakewell Junction - sweet and yummy for your Christmas baking.Colorful Candy Bar Cookies

Yield:  24 cookies                 Cook Time:  12 minutes

Ingredients:

Dough:

  • 1 3/4 cups flour
  • 1/2 teaspoon baking powder
  • 1/4 teaspoon salt
  • 1/4 lb (1 stick) unsalted butter, softened
  • 3/4 cup sugar
  • 1/2 teaspoon vanilla extract
  • 1 extra large egg
  • Alternatively, you can use 1/2 tube refrigerated sugar cookie dough, softened plus 1/4 cup flour

Filling:

  • 24 mini (1 inch squares) Snickers candy bars or 12 snack size Snickers candy bars, cut in half

Garnish:

  • red and green colored sugar

Step 1:  For the dough:  If using the scratch cookie dough recipe, in a small bowl, combine flour, baking powder and salt and set aside.  In a large bowl, combine the butter, egg, vanilla and sugar and blend with an electric mixer, since this is a small dough a hand held mixer will do.  Stir flour mixture to the butter mixture until just combined – this will be more of a folding motion rather than stirring.  If using the alternative for the dough, combine the store bought cookie dough and 1/4 cup flour in a medium bowl.

Step 2:  Assembly:  Place red and green sugars in two separate small bowls.  Using about 1 1/2 teaspoons of dough for each cookie, make a flattened circle with the dough, place the candy bar square in the middle and spread the dough around the candy evenly.  Roll the dough ball in one of the colored sugars until completely covered.  Place on a parchment lined cookie sheet two inches apart.  Repeat until there are 12 cookies on the pan.  Bake in a preheated 350 degree oven for 10 to 12 minutes.  Repeat with the remaining dough on another cookie sheet.

Storing:  Store at room temperature in a sealed plastic container for a few days until ready to serve.

Enjoy!!!

Sugar cookie recipe adapted from Family Circle magazine, 12/12/2000.
Cookie recipe adapted from Taste of Home.

This post may also be entered in these linky parties.  Click the here to visit the other great posts in the blog hops.

Ultimate Crumb Apple Crumble

Here’s a delicious and easy Ultimate Crumb Apple Crumble recipe for your next holiday meal.  I got rave reviews.  My sister said it was the best apple pie she ever ate (I didn’t correct her).  My sister-in-law said that I outdid myself with this recipe.  It was her idea to combine my ultimate crumbs with apple pie filling.

Ultimate Crumb Apple Crumble | Bakewell Junction - the best you'll ever make.

Ultimate Crumb Apple Crumble | Bakewell Junction

The filling’s flavor gets infused into the crumbs, so they are just amazingly delicious.  Don’t be fooled by the pictures, I didn’t have enough time or crumble to linger over the pictures.  This photo was two seconds before everyone dug in.

Hope everyone had a great Thanksgiving.  We had six to seven inches of snow and 13 hours of no power (yes, no power on Thanksgiving).  We postponed the holiday dinner until Saturday.  It was wonderful to see everyone even though it was postponed.  It sort of threw me off schedule too because this was the Pizzelle making weekend so the hubby and I squeezed it in on Sunday.

Ultimate Crumb Apple Crumble | Bakewell Junction - the best you'll ever have.Crumbs on the top, crumbs on the bottom… It can’t get any better than this!

See that large crumb on the tip of this piece?  I grabbed it and ate it just after I took the picture.

Enjoy!

Last but not least, today is D Day the Day that Will Live in Infamy!  Thank you to all the veterans who fought and those that still fight for our freedom.

Ultimate Crumb Apple Crumble

Yield:  12 servings                 Cook Time:  105 minutes

Ingredients:

Crumbs:

  • 1 lb butter, melted
  • 5 cups flour
  • 1 1/2 cups sugar
  • 1 tablespoon cinnamon
  • 1 tablespoon vanilla extract

Filling:

  • 1 cup (packed) golden brown sugar
  • 3 tablespoons all purpose flour
  • 2 teaspoons finely grated lemon peel (substitution 2 teaspoon lemon juice)
  • 1 1/4 teaspoons ground cinnamon
  • 2 3/4 pounds Honeycrisp apples (about 6 medium), peeled, halved cored, cut into 1/4 inch thick slices and then 1/3 inch chunks (about 8 cups) (can use yellow-skinned ripe Golden Delicious)
  • 2 teaspoons vanilla extract

Garnish:

  • powdered sugar for sprinkling, one or more tablespoons to taste
  • whipped cream (optional)
  • vanilla ice cream (optional)

Step 1:  For the filling:  In a large bowl, mix brown sugar, flour, lemon peel, and cinnamon in large bowl.  Add apple slices and vanilla.  Mix until well coated.  Move the mixture to a stock pot and begin heating on medium for about 10 minutes.  When the mixture begins bubbling, turn it down to low and cook for another 20 to 30 minutes until the apples are fork tender.  Let the mixture cool to about room temperature.

Step 2:  For the crumbs:  While the filling is cooling, mix together all the ingredients for the crumbs with a fork to start.  Finish mixing with fingers.  There should be large crumbs.

Step 3:  Assembly:  Spray the pie pan liberally with cooking spray.  Press about 1/3 to 3/8 of the crumbs onto the bottom and up the sides of the pie plate.  Bake in a preheated 350 degree oven for 15 minutes.  Remove the pie plate from the oven and let cool.

Step 4:  Spoon the cooled apple pieces onto the bottom crumbs.  Leave any extra liquid behind.  Cover the edges of the crumbs with aluminum foil so they don’t get too dark. Bake in a preheated 375 degree oven for 40 minutes with a cookie sheet or aluminum foil underneath to catch any possible drippings.

Step 5:  Remove the crumble from the oven and sprinkle with the remaining crumbs evenly across the top.  The crumbs will sink into the apple filling a little, that’s to be expected.  Return the crumble to the oven and bake for another 20 to 30 minutes.  Remove from oven and cool on a rack completely.  Sprinkle with powdered sugar.  Serve with whipped cream or vanilla ice cream.  Hide any leftovers so you have some when you’re craving it.

Storing:  Store at room temperature covered with plastic wrap for a few days until ready to serve.

Enjoy!!!

Filling recipe adapted from Bonappetit posted by Chris Hall.
Crumb recipe adapted from my co-worker’s wife’s home recipe.

This post may also be entered in these linky parties.  Click the here to visit the other great posts in the blog hops.

Glazed Italian Lemon Cookies

I’d love it if you would Follow my blog with Bloglovin

Do you bake for the holidays?  Here’s a simple and tasty Glazed Italian Lemon Cookie recipe.  You can halve the recipe if you need a smaller amount of cookies but if you’re sharing, definitely make the whole recipe.

Italian Glazed Lemon Cookies | Bakewell Junction

Italian Glazed Lemon Cookies | Bakewell Junction

My hubby, brother-in-law and friends loved these cookies.  The hubby liked them unglazed too.  Because the glaze uses milk instead of water, it dries to a matte finish instead of shiny but using milk gives it a better flavor.

Italian Glazed Lemon Cookies | Bakewell Junction

Why don’t you join us for another week of 12 Weeks of Christmas Treats.

Brenda from Meal Planning Magic hosts 12 Weeks of Christmas Treats and I hope you’ll join us this year.  I’ve participated for the last two and had a great time each year.

Enjoy!

Glazed Italian Lemon Cookies

Yield:  9 dozen cookies                 Cook Time:  10 minutes

Ingredients:

Dough:

  • 5 cups flour
  • 4 teaspoons baking powder
  • 1 teaspoon baking soda
  • 1 pinch salt
  • 1 1/4 cups Crisco shortening (I used the shortening sticks)
  • 4 eggs
  • 2 cups sugar
  • 3 teaspoons lemon extract
  • 1 pint sour cream

Frosting:

  • 4 cups powdered sugar
  • 2 teaspoons lemon extract
  • 2 + tablespoons milk as needed
  • food coloring if desired
  • sprinkles if desired

Step 1:  For the dough:  In a large bowl, mix flour, baking powder and baking soda together and set aside.  In a stand mixer beat together the salt, shortening, eggs, sugar and lemon extract.

Step 2:  Beat in the flour mixture and sour cream in alternating increments.  Mix until just combined.  The dough will be sticky.  Drop heaping tablespoonfuls on parchment lined baking sheets two inches apart.  Bake in a preheated 375 degree oven for 10 minutes.  Let cool for 5 minutes in the pan before transferring to cooling racks to cool completely.  Repeat for the remaining dough.

Step 3:  For the glaze:  Add the powdered sugar to a large bowl and then add the lemon extract.  Add milk gradually until powdered sugar mixture is slightly thicker than water.  I dipped the tops of the cookies in to the glaze and placed them on a plate to dry.  If you want a thicker glaze, dip them again.

Storing:  Store in a sealed plastic container for a few weeks.

Enjoy!!!

Recipe adapted from my co-worker’s wife’s home recipe.

This post may also be entered in these linky parties.  Click the here to visit the other great posts in the blog hops.

12 Weeks of Christmas Treats Blog Hop | Hosted by MealPlanningMagic.com

You can find out all about the 12 Weeks of Christmas Treats by clicking here for more information and details about joining in.
If you’re a blogger, be sure to check the guidelines, join the challenge and then link up your own post each week.

And everyone, don’t forget to check out all the recipes at Meal Planning Magic for even more inspiration!

Sausage Stuffing

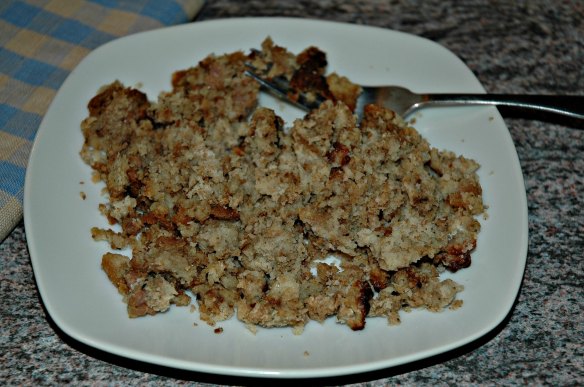
Sausage Stuffing | Bakewell Junction

Sausage Stuffing | Bakewell Junction

Hi there.  If you’re like me and you’re making a big meal for a holiday or any special occasions, you prefer eating the appetizers, sides and desserts rather than the main meal.  The picture doesn’t do this dish justice and quite honestly I don’t know how to make it better.  I don’t like gravy on my stuffing but you could always add it if you like.

The last few gathering I’ve had this Sausage Stuffing as a wonderful side dish.  My sister-in-law has been making this recipe for longer than I’ve known her (at the risk of dating myself, I won’t go into how long that’s been).  She gladly gave it to me and now I’m sharing it with you.  The recipe uses a store bought stuffing mix but you can substitute a homemade stuffing also.  This stuffing recipe is so good you’ll be going back for seconds and thirds.

Enjoy!

Sausage Stuffing 

Yield:  12 servings                  Cook Time:  45 minutes

Ingredients:

  • 1 1/2 to 2 pounds removed from casing and crumbled
  • 1 pound of your favorite stuffing package (it’s difficult to find a full 1 pound package, so a 14 ounce one will work)
  • 20 to 30 ounces chicken canned broth (I generally start with 2 15 ounce cans and add a couple of ounces of water if I need it)
  • 1 small or 1/2 medium onion, chopped
  • 2 celery stalks, finely chopped
  • 2 minced garlic cloves (optional – I skip this ingredient)
  • 2 tablespoons butter, sliced in to 8 thin pats
  • 1/2 teaspoon salt
  • 1 tablespoon oil (optional)

Directions:

Step 1:  Brown sausage with oil, if using, in a large sauce pan.  The last time I made this I used the broiler to brown the sausage.  Turn the sausage crumbles so the pieces brown on all sides.

Step 2:  Add the onion, celery and garlic, if using, and saute a bit longer.  Remove the mixture from the heat and let cool a bit.

Step 3:  In a half size steam tray pan or a lasagna pan, add the stuffing mix and sausage.  Mix to distribute sausage throughout the stuffing mix.  Add chicken broth and mix to moisten throughout.  If you need a little more liquid, add an ounce or two of water.  Spread mixture evenly in the pan and place the butter pats on top of the mixture.  Cover with aluminum and bake in a pre-heated 350 degree oven for about 45 minutes to 1 hour.  About halfway through cooking, remove the aluminum covering to allow the stuffing to brown on top.  Serve warm.

Tips:  This stuffing is delicious cold out of the fridge or as warmed leftovers.  Also, you can prepare the stuffing the day before up to covering with aluminum foil and then store in the fridge until you’re ready to bake for the special meal.

Enjoy!!!

This post may also be entered in these linky parties.  Click the here to visit the other great posts in the blog hops.

Cannoli Cream Filled Chocolate Chip Cookie Cups #ChocolateParty

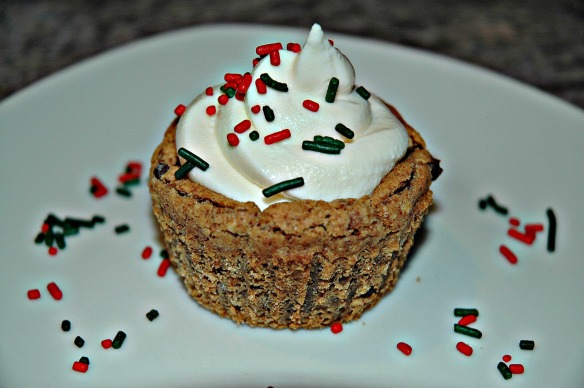
Cannoli Cream Chocolate Chip Cookie Cup | Bakewell Junction

Cannoli Cream filled Chocolate Chip Cookie Cup | Bakewell Junction

Oh, no!  I missed the last two weeks of the 12 Weeks of Christmas Treats blog hop and haven’t posted in a while because my laptop went kaput.  Not fun.  A nasty virus took over the entire machine and blocked me from doing anything.  While it was an old machine anyway, I was trying to eek out some more time with it.

On to better things with this month’s #ChocolateParty.  The theme for the December Chocolate Party is any type of chocolate cookie.

I love Cannoli Cream filling but I was never fond of the Cannoli shell.  To me, the shell is only a vehicle to get my fill of Cannoli Cream yumminess.  I’ve made cookie cannoli shells before but they were very delicate.  I thought that making the shell out of my favorite chocolate chip cookie dough would be less fragile.  My attempt failed because I couldn’t shape the cookies after they were baked.  They broke instead of curling into a cylinder.  I had to change plans quickly, so I changed the shape with the remaining dough into cookie cups using a regular sized cupcake pan.  Boy, you can get a whole lot of Cannoli Cream into those cookie cups!  Yum!

These would be wonderful as an addition to your New Year’s dessert table.  You will need to begin preparing the ingredients ahead of time and assemble just before serving.  I served them as one of the desserts for Thanksgiving and there was no talking as everyone was eating them, just mmmmm’s from the very first bite.  Great endorsement, wouldn’t you agree?

Cannoli Cream filled Chocolate Chip Cookie Cups

Yield:  30 servings                  Cook Time:  15 minutes

Dough:

  • 4 ounces chocolate bar (I used Hershey’s)
  • 1 cup room temperature butter (2 sticks)
  • 1 cup sugar
  • 1 cup brown sugar
  • 2 eggs
  • 2 teaspoons vanilla extract
  • 1 teaspoon baking soda
  • 1 teaspoon baking powder
  • 1/2 teaspoon salt
  • 2 cups flour
  • 2 1/4 cups old fashioned oatmeal
  • 2 cups semi-sweet chocolate chips (I used Ghirardelli’s)

Cannoli Cream Filling:

  • 2 lb container Polly-O ricotta cheese, drained overnight in a 2-ply cheesecloth (it drains best at room temperature, provided it’s cooler than 70 degrees)
  • 1 1/2 t vanilla extract
  • 1 1/2 c powdered sugar, sifted
  • 2/3 c mini chocolate chips; plus some additional for garnish

Topping:

  • mini chocolate chips (I prefer Ghirardelli)
  • Chocolate sprinkles or colored sprinkles (Holiday colored)

Directions:

Step 1:  For the Cannoli Cream filling:  at least three days before serving, mix drained ricotta, vanilla and sugar together.  Move the mixture to a food processor (I used a small Kitchen Aid chopper) and mix until the filling is smooth and is the right consistency.  Depending on the size of your food processor or chopper, you may need to mix in small batches.

Step 2:  Fold in the mini chocolate chips, cover loosely and store at least overnight (better yet two nights) in the refrigerator.  When ready to fill, transfer the filling to a gallon size Ziploc bag make a 1/2 inch cut on one corner of the Ziploc bag.  Use as a pastry bag to fill the chocolate chip cookie cups.

Step 3:  For the cookie cups:  Grate the chocolate bar and set aside.  Grind the oatmeal to a fine powder in a blender, food processor or mini chopper.  Since I only have a mini chopper, I grind this in two batches.  This isn’t mandatory but to make sure the oatmeal is ground finely enough, I put the oatmeal through a sieve and whatever is left gets ground again.  I repeat this process until my mini chopper can’t grind it anymore.  At the end if there’s a small amount that can’t be ground finely enough, I discard it.  In a large bowl, combine the ground oatmeal, flour, salt, baking powder and baking soda and set aside.

Step 4:  With an electric mixer beat the butter and sugars together for about 4 to 5 minutes until the mixture is fluffy.  Beat the eggs and vanilla into the butter mixture.  Add in the flour mixture using a spatula or wooden spoon until incorporated.  Mix in the chocolate chips and grated chocolate bar.  Optionally chill dough for several hours to overnight.  This helps the flavors meld.  Try not to eat too much of the dough.

Step 5:  Line a regular sized cupcake pan with paper cupcake liners.  Lightly press about a tablespoon of cookie dough into the bottom of each liner.  Add about another tablespoon of cookie dough for the sides of the cup.  Carefully spread the cookie dough evenly around the sides.  Bake in a preheated 375 degree oven for 10 minutes.  Lower the oven temperature to 350 degrees and bake for another 5 minutes.  The cookie cups will be puffed up and look like cupcakes.  Cool 5 minutes.  Using a mini ladle (1 or 2 ounce size), press the cup side down into the cookie cups to make a well in the center.  You can also use the back of a spoon or a pestle to create the well.  Let the cookie cups cool completely.  Repeat for the remaining dough.

Step 6:  Fill the cookie cups with Cannoli cream.  Top with mini chocolate chips, chocolate sprinkles and or red and green Christmas sprinkles.  Serve immediately.

Storing:  Store empty cookie cups in a sealed plastic container for a few days.

Enjoy!!!

Recipe adapted from the fake Neiman Marcus Cookie recipe e-mail that’s been all over the internet.

Our #ChocolateParty December theme is any type of chocolate cookies.  If you’d like to join in, please follow these rules:

1.)  Blog about your chocolate treat.  Your recipe must include the two ingredients we choose.  It can be a simple no bake treat or a sophisticated layer cake; the complexity level of the recipe is totally up to you.
2.)  Include a link back to the Chocolate party page.  Optionally, add the Chocolate Party logo in your blog post or on your sidebar.
3.)  Your recipe must be published during the current month.  Please do not link old recipes, they will be deleted.

I hope you’ll join our party and bake along with us.  Also, if you’d like to know what are we up to and what ingredients we pick for the next parties, join our Facebook group.
All submitted posts will be pinned to the Chocolate party Pinterest board and will be promoted on other social media platforms using the #chocolateparty hashtag.

Add your link to the Chocolate Cookies Party.  Your link will be displayed on the Roxana’s Home Baking site.

This post may also be entered in these linky parties.  Click the here to visit the other great posts in the blog hops.

Jelly Belly Cookies #12WksXmasTreats

Jelly Belly Cookies | Bakewell Junction

Jelly Belly Cookies | Bakewell Junction

It’s time for the tenth week of 12 Weeks of Christmas Treats blog hop.  It’s hosted by Brenda Thompson from MealPlanningMagic.com.  The blog hop goes live every Wednesday until Christmas.  If you’d like to join us, please fill out the form on Brenda’s blog.

Time is flying by so fast.  I can’t believe we’re nearing the end of the 12 Weeks of Christmas Treats.  For this week’s entry, I intended to post a pumpkin pie but it was a failure (a.k.a I didn’t like it).  I had to find a quick and tasty recipe and decided on this one that my friend Chris had given me last year.  This is a tender butter cookie with raspberry jam or preserves in the center.  You can add powdered sugar if you like but I think they are great without.  The hubby and his friend loved them.

Jelly Belly

Yield:  48 cookies                  Cook Time:  12 minutes

  • 1 cup (2 sticks) butter, room temperature or softened
  • 3/4 cup sugar
  • 3/8 teaspoons salt
  • 1 1/2 large egg yolks
  • 1 teaspoon vanilla extract
  • 2 1/3 cups flour
  • 3/4 cups raspberry jam or seedless preserves (I used preserves)

Directions:

Step 1:  Line two cookie sheets with parchment paper.  Preheat oven to 350 degrees.

Step 2:  With an electric mixer, cream together butter, salt and sugar for a few minutes until lightened in color and fluffy.  Beat in egg yolks and vanilla until smooth.  Gradually mix in flour until well combined.

Step 3:  Form level teaspoons of dough into balls (mine had a little more dough) and place on cookie sheets about 1 inch apart.  Indent each dough ball with knuckle or thumb and fill with 1/4 teaspoons of jam or preserves.

Step 4:  Bake 12 to 14 minutes at 350 degrees until edges begin to become pale golden (mine didn’t change color but after they cooled the bottoms were light golden).  Cool completely before removing them from the pan as they are delicate.  Sprinkle with powdered sugar if desired.

Storing:  Store cookies in a sealed plastic container.

Recipe minimally adapted from friend Chris’ family recipe.

12 Weeks of Christmas Treats Blog Hop | Hosted by MealPlanningMagic.com

12 Weeks of Christmas Treats Blog Hop

Week 10, November 27, 2013

Powered by Linky Tools

Click here to enter your link and view this Linky Tools list…

This post may also be entered in these linky parties.  Click the here to visit the other great posts in the blog hops.

Gingered Monkey Bread #12WksXmasTreats #TwelveLoaves

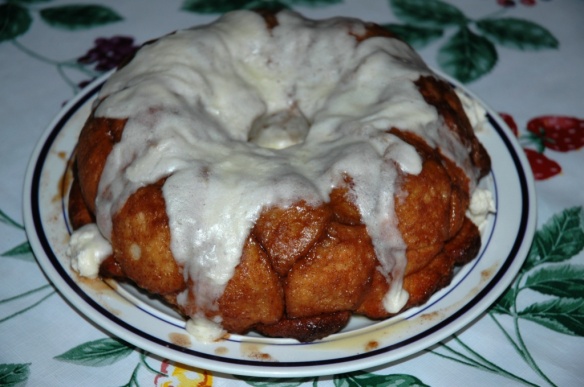
Gingered Monkey Bread | Bakewell Junction

Gingered Monkey Bread | Bakewell Junction

It’s time for the ninth week of 12 Weeks of Christmas Treats blog hop.  It’s hosted by Brenda Thompson from MealPlanningMagic.com.  The blog hop goes live every Wednesday until Christmas.  If you’d like to join us, please fill out the form on Brenda’s blog.

This is the ninth week of Christmas Treats.  This recipe combines the #TwelveLoaves and #12WksXmasTreats.  Since the theme for Twelve Loaves November is spice and I wanted to make something I’ve never made before, I looked for a Monkey Bread recipe.  Monkey Bread usually has cinnamon but I thought it would be more seasonal for a gingery version.  Plus I added a twist with mascarpone icing instead of cream cheese icing and lightly echoed the spice flavors in the icing.  This Gingered Monkey Bread would be great for breakfast, brunch or dessert for your holiday table.  If you like super gooey and sweet treats, this one is for you.

Gingered Monkey Bread

Yield:  6 to 8 servings                 Cook Time:  35 minutes

Ingredients:

Dough:

  • 2 tablespoons melted butter
  • 1 cup milk, warmed to 110 degrees
  • 1/2 cup water, warmed to 110 degrees
  • 1/4 cup sugar
  • 2 1/4 teaspoons instant yeast
  • 3 1/4 cups flour, plus extra for work surface
  • 2 teaspoons salt

Coating:

  • 1 to 1 1/2 packed brown sugar (I used 1 1/2 cups)
  • 3 teaspoons ground ginger
  • 1 1/2 teaspoons ground cinnamon
  • 1/4 teaspoons ground cloves
  • 8 to 12 tablespoons (1 to 1 1/2 sticks) butter (I used 1 1/2 sticks)

Icing:

  • 4 ounces mascarpone cheese, softened
  • 4 tablespoons (1/2 stick) butter, softened
  • 1 1/2 cups powdered sugar
  • 1 teaspoon vanilla extract
  • 1/4 teaspoon ground ginger
  • 1/4 teaspoon ground cinnamon
  • 3 or more teaspoons milk

Directions:

Step 1:  For the Dough:  Mix the milk, water, melted butter, sugar and yeast in a two cup measure.  I used a microwave safe glass measure and heated the milk and water at full power for 1 minute, 20 seconds to reach 110 degrees.  In the bowl of a stand mixer, add the flour and salt.  Using the dough hook attachment, start the mixer on low.  Add the milk mixture slowly.  Scrape down the sides as needed until the flour is incorporated.  Increase the mixer speed to medium (raised my KA to the 5 setting) and let it knead for another 6 to 7 minutes.  If the dough looks overly wet, add 2 tablespoons of flour at a time and continue mixing until the dough forms a mass.  Spray a large bowl with cooking spray.  Transfer the dough to the bowl and spray the dough also.  Cover the bowl with a clean dish towel and use my tip below to aid the rise.  Let the dough rise until doubled.  If using my tip, it will double in 45 to 60 minutes.  If not, it may take 1 to 2 hours.

Step 2:  For the coating:  As the dough rises, combine the brown sugar, ginger, cinnamon and cloves in a bowl.  Place the melted butter in a small bowl.  If you would like to dial back the sweetness and gooeyness of the recipe, use the lesser amounts of sugar and butter.  Set aside.

Step 3:  For the shaping the dough balls:  Sprinkle a clean work surface with flour.  Transfer the dough onto the floured surface.  Spread and press the dough into about an 8 inch square.  Cut the dough into 8 by 8 slices with a bench scraper or knife.  This will give you 64 pieces.

Step 4:  Spray the bundt pan with cooking spray.  Roll each piece of dough into a ball shape.  Dip each dough ball into the melted butter individually.  Then roll them in the brown sugar mixture until they are well coated.  Place the dough ball into the bundt pan.  Layer the dough balls so they are offset and the dough ball on top is placed on the seam of dough balls below.  Repeat until all the dough balls are in the bundt pan.  If there’s any remaining melted butter or brown sugar, set aside.

Step 5:  Cover the bundt pan with a clean dish cloth or plastic wrap.  Let rise until puffy and until they are about an inch or two from the top of the pan.  If using my oven tip below, let rise for 45 minutes.  If not, let rise for 1 to 2 hours.  If there’s any remaining melted butter, drizzle it over the top of the dough balls.  If there’s any remaining brown sugar, sprinkle it over the top of the dough balls too.

Step 6:  Bake unwrapped 30 to 35 minutes in a preheated 350 degree oven.  When done the top should be browned and the coating begins bubbling a bit.  Let bread cool in the pan for a maximum of 5 minutes.  Any longer and it will be difficult to depan.  Invert bread onto a large plate.

Step 7:  For the Icing:  While the doughs cools a bit, add butter and mascarpone cheese to a large mixing bowl.  Beat 4 to 5 minutes.  I beat them on high using a hand-held mixer.  Beat in vanilla extract, ginger and cinnamon.  Mix in the powdered sugar at a lower speed (this prevents having powdered sugar everywhere).  Mix in the milk.  If you want a thinner icing, add more milk in teaspoons increments until you reach desired consistency.  While the bread is still warm, spread the icing on top of the bread – the icing will drizzle down the sides of the dough.  Serve warm or cold.

Recipe inspired by Cooks Illustrated.

Tips:  If your house is chilly like mine always is and your dough doesn’t rise, you can boil a pot of water while preparing the dough and place the water and dough in a cold oven.  The boiling water will create a warm moist environment in the oven for the dough to rise well.  Leave the oven light on and it will add to the warming effect.

12 Weeks of Christmas Treats Blog Hop | Hosted by MealPlanningMagic.com

12 Weeks of Christmas Treats Blog Hop

Week 9, November 20, 2013

Powered by Linky Tools

Click here to enter your link and view this Linky Tools list…

************************************************************************

#TwelveLoaves November-Spice.  October #TwelveLoaves was about baking with Root Vegetables.  It was quite a delicious month! Temperatures are dropping and it is the right moment to explore bread and SPICE!  Share your November Spice Bread (yeast or quick bread).  Let’s get baking!

If you’d like to add your bread to the collection with the Linky Tool this month, here’s what you need to do!

1. When you post your Twelve Loaves bread on your blog, make sure that you mention the Twelve Loaves challenge in your blog post; this helps us to get more members as well as share everyone’s posts.  Please make sure that your bread is inspired by the theme!

2. Please link your post to the linky tool at the bottom of my blog.  It must be a bread baked to the Twelve Loaves theme.

3. Have your Twelve Loaves bread that you baked this November, 2013, and posted on your blog by November 30, 2013.

#TwelveLoaves is a monthly bread baking party created by Lora from Cake Duchess.  #TwelveLoaves runs so smoothly thanks to the help of the lovely Paula from Vintage Kitchen Notes and Renee from Magnolia Days.

Are you hungry for amazing bread? Check out what the Twelve Loaves bakers have created this month:

You are next… Click here to enter

This post may also be entered in these linky parties.  Click the here to visit the other great posts in the blog hops.

Chocolate Bourbon Pecan Pie #12WksXmasTreats #ChocolateParty

Chocolate Bourbon Pecan Pie | Bakewell Junction

Chocolate Bourbon Pecan Pie | Bakewell Junction

It’s time for the eighth week of 12 Weeks of Christmas Treats blog hop.  It’s hosted by Brenda Thompson from MealPlanningMagic.com.  The blog hop goes live every Wednesday until Christmas.  If you’d like to join us, please fill out the form on Brenda’s blog.

This week I’m combining the #12WksXmasTreats with November’s #ChocolateParty.  The theme for the Chocolate Party is pecans.  I’ve always wanted to make pecan pie…not just regular pecan pie, I’d seen this decadent version has chocolate and another layer of flavor with the bourbon.

I had boxed pie crust mix left over from a bout of pie baking my husband had a while back, so I used that for the crust of this Chocolate Bourbon Pecan Pie recipe.  You can use a homemade crust or a pre-made crust from the supermarket.  Two of my brothers-in-law were visiting yesterday and this pie came together rather quickly while they were here.  They loved the pie and my hubby (who doesn’t like pecans) even asked for a second piece.  He also demanded that I make it again not just this once for the blog.  I’d say this recipe is a winner.

Chocolate Bourbon Pecan Pie

Yield:  8 – 10 servings                  Cook Time:  60 minutes

  • 1 – 9 inch deep dish prepared pie crust
  • 3 large eggs
  • 3/4 cup light of corn syrup
  • 4 tablespoons melted butter
  • 3/4 cup packed light brown sugar
  • 3 tablespoons bourbon (I used honey Jack Daniels)
  • 1 tablespoons vanilla extract
  • 2 tablespoons flour
  • 2 cups pecans, divided
  • 1 cup milk chocolate chips

Directions:

Step 1:  Chill the prepared pie crust in the refrigerator or freezer while you make the filling.  Mix the eggs, corn syrup, butter, sugar, bourbon, vanilla and flour in a large bowl.  I used an electric mixer.

Step 2:  Sprinkle the chocolate chips evenly on the bottom of the pie crust.  Coarsely chop 1 1/2 cups of pecans the pecans and sprinkle evenly on the bottom of the pie crust.  Carefully pour the filling into the pie crust.  For a pretty presentation, place the remaining pecans on the top in a circular fashion.

Step 3:  Bake in a 425 degree preheated oven for 15 minutes.  I used a glass pie plate so I baked the pie at 400 degrees for 20 minutes.  Reduce the temperature to 350 degrees.  Continue baking for 45 minutes.  Cool pie until set, at least one hour.  Serve warm or at room temperature with a scoop of vanilla ice cream or whipped cream.

Storing:  Store covered by plastic wrap at room temperature.

Recipe adapted from Amateur Gourmet and She Wears Many Hats.

12 Weeks of Christmas Treats Blog Hop | Hosted by MealPlanningMagic.com

12 Weeks of Christmas Treats Blog Hop

Week 8, November 13, 2013

Powered by Linky Tools

Click here to enter your link and view this Linky Tools list…

************************************************************************

Our #ChocolateParty November theme is pecans and chocolate.  If you’d like to join in, please follow these rules:

1.)  Blog about your chocolate treat.  Your recipe must include the two ingredients we choose.  It can be a simple no bake treat or a sophisticated layer cake; the complexity level of the recipe is totally up to you.
2.)  Include a link back to the Chocolate party page.  Optionally, add the Chocolate Party logo in your blog post or on your sidebar.
3.)  Your recipe must be published during the current month.  Please do not link old recipes, they will be deleted.

I hope you’ll join our party and bake along with us.  Also, if you’d like to know what are we up to and what ingredients we pick for the next parties, join our Facebook group.
All submitted posts will be pinned to the Chocolate party Pinterest board and will be promoted on other social media platforms using the #chocolateparty hashtag.

Add your link to the Chocolate Candy Party.  Your link will be displayed on the Roxana’s Home Baking site.

This post may also be entered in these linky parties.  Click the here to visit the other great posts in the blog hops.