Apple Cider Monkey Bread #TwelveLoaves

I’d love it if you would Follow my blog with Bloglovin

Apple Cider Monkey Bread | Bakewell Junction - gooey and delicious

Apple Cider Monkey Bread | Bakewell Junction

I almost ran out of time to create a post for #TwelveLoaves this month.  As the weather turns cooler, we all begin thinking of apple desserts.  This one perfectly marries my monkey bread obsession with the apple challenge.  It’s hard to believe I made my first monkey bread less than a year ago.

I’ll submit this recipe to the Twelve Weeks of Christmas Treats too.  Apples work for fall and winter recipes.  This recipe would be perfect as dessert or brunch or snacks or any time.

What is your favorite apple dessert?

Apple Cider Monkey Bread | Bakewell Junction

Apple Cider Monkey Bread | Bakewell Junction


Apple Cider Monkey Bread

Yield:  6 to 8 servings                Cook Time:  30 minutes

Ingredients:

Dough:

  • 2 tablespoons melted butter
  • 3/4 cup milk, warmed to 110 degrees
  • 3/4 cup apple cider, warmed to 110 degrees
  • 1/4 cup sugar
  • 2 1/4 teaspoons instant yeast
  • 3 1/4 cups flour, plus extra for work surface
  • 2 teaspoons salt

Coating:

  • 1 to 1 1/2 packed brown sugar (I used 1 1/2 cups)
  • 2 teaspoons ground cinnamon
  • 8 tablespoons (1 stick) butter, melted
  • 1/4 cup apple cider

Icing:

  • 4 ounces mascarpone cheese, softened
  • 4 tablespoons (1/2 stick) butter, softened
  • 1 1/2 cups powdered sugar
  • 1 teaspoon vanilla extract
  • 1/4 teaspoon ground cinnamon
  • 2 tablespoons or more apple cider

Directions:

Step 1:  For the dough:  I used a microwave safe glass measure and heated the milk and apple cider at full power for 1 minute, 40 seconds to reach 110 degrees.  Mix the milk, apple cider, melted butter, sugar and yeast in a two cup measure.  In the bowl of a stand mixer, add the flour and salt.  Using the dough hook attachment, start the mixer on low.  Add the milk mixture slowly.  Scrape down the sides of the bowl as needed until the flour is incorporated.  Increase the mixer speed to medium (raised my KA to the 5 setting) and let it knead for another 6 to 7 minutes.  If the dough looks overly wet, add 2 tablespoons of flour at a time and continue mixing until the dough forms a mass.  Spray a large bowl with cooking spray.  Transfer the dough to the bowl and spray the dough also.  Cover the bowl with a clean dish towel and use my tip below to aid the rise.  Let the dough rise until doubled.  If using my tip, it will double in 45 to 60 minutes.  If not, it may take 1 to 2 hours.

Step 2:  For the coating:  As the dough rises, combine the brown sugar and cinnamon in a bowl.  Place the melted butter and and apple cider in a small bowl.  Set aside.

Step 3:  For the shaping the dough balls:  Sprinkle a clean work surface with flour.  Transfer the dough onto the floured surface.  Spread and press the dough into about an 8 inch square.  Cut the dough into 8 by 8 slices with a bench scraper or knife.  This will give you 64 pieces.

Step 4:  Spray a bundt pan with cooking spray.  Shape each dough piece into a ball.  Dip each dough ball into the melted butter mixture individually and let excess drip back into the bowl.  Then roll them in the brown sugar mixture until they are well coated.  Place the dough ball into the bundt pan.  Layer the dough balls so they are offset and the dough ball on top is placed on the seam of dough balls below.  Repeat preparing the dough balls until all are in the pan.  If there’s any remaining melted butter mixture or brown sugar, set aside.

Step 5:  Cover the bundt pan with a clean dish cloth or plastic wrap.  Let rise until puffy and until they are about an inch or two from the top of the pan.  Mine rose to the top of the pan.  If using my oven tip below, let rise for 50 minutes.  If not, let rise for 1 to 2 hours.  If there’s any remaining melted butter, drizzle it over the top of the dough balls.  If there’s any remaining brown sugar, sprinkle it over the top of the dough balls too.

Step 6:  Bake unwrapped 30 to 35 minutes in a preheated 350 degree oven with a cookie sheet underneath the pan.  I’ve found that at least one or two dough balls try to escape during baking and the cookie sheet prevents them from burning on the bottom of the oven and causing a ton of smoke.  When done, the top should be browned and the coating begins bubbling a bit.  Let bread cool in the pan for a maximum of 10 to 15 minutes.  Any longer and it may be difficult to depan.  Invert bread onto a large plate.

Step 7:  For the Icing:  While the dough cools to almost room temperature, add butter and mascarpone cheese to a large mixing bowl.  Beat 2 minutes.  I beat them on high using a hand-held mixer.  Beat in vanilla extract and cinnamon.  Mix in the powdered sugar at a lower speed (this prevents having powdered sugar everywhere).  Mix in the apple cider.  If you want a thinner icing, add more apple cider in teaspoon increments until you reach desired consistency.  Spread the icing on top of the bread – the icing will drizzle down the sides of the dough.  Serve warm or cold.

Enjoy!

Recipe inspired by Cooks Illustrated.

Tips:  If your house is chilly like mine always is and your dough doesn’t rise, you can boil a pot of water while preparing the dough and place the water and dough in a cold oven.  The boiling water will create a warm moist environment in the oven for the dough to rise well.  Leave the oven light on and it will add to the warming effect.  I use this tip even during the warm weather months.

This month, the #TwelveLoaves bakers are baking with APPLES!

#TwelveLoaves is a monthly bread baking party created by Lora from Cake Duchess and run with the help of Heather of girlichef, which runs smoothly with the help of our bakers.

Our host this month is Heather from girlichef, and our theme is Apples. For more bread recipes, visit the #TwelveLoaves Pinterest board, or check out last month’s mouthwatering selection of #TwelveLoaves Pear Breads!

#TwelveLoaves: Apples

If you’d like to add your bread to this month’s #TwelveLoaves collection, here’s what you need to do:

    1. Post your Twelve Loaves bread on your blog, making sure to mention the Twelve Loaves challenge in your blog post (this helps us to get more members as well as share everyone’s posts).
    2. Please link your post to the linky tool at the bottom of this blog. The bread MUST meet the Twelve Loaves theme (October = Apples).
    3. Share your Twelve Loaves bread (must be baked and post this month) on your blog by October 31, 2014.

#TwelveLoaves is a monthly bread baking party created by Lora from Cake Duchess.

You are next… Click here to enter

This post may also be entered in these linky parties.  Click the here to visit the other great posts in the blog hops.

12 Weeks of Christmas Treats Blog Hop | Hosted by MealPlanningMagic.com

You can find out all about the 12 Weeks of Christmas Treats by clicking here for more information and details about joining in.
If you’re a blogger, be sure to check the guidelines, join the challenge and then link up your own post each week.

And everyone, don’t forget to check out all the recipes at Meal Planning Magic for even more inspiration!

Fresh Cherry Monkey Bread #TwelveLoaves

Fresh Cherry Monkey Bread | Bakewell Junction - addicting and delicious

Fresh Cherry Monkey Bread | Bakewell Junction

We’re at the end of June and I almost missed the #TwelveLoaves party.  I had another recipe failure last week otherwise I would have posted this last week.  It’s another addictive and sweet Monkey Bread.  Last week the bread was undercooked and didn’t hold the shape of the bundt pan after it was inverted onto a plate.  I revised how many cherries I used and a couple of other minimal changes.  So now I have a delicious recipe to share with you.

This recipe is gooey, addictive and delicious.  The cherries negate all the sugar and butter – right?  Each dough ball has cherry in it.  You can see the layer of cherries in the middle of the ring in the picture below.  I used the red cherries in the recipe and the white and blush colored cherries are Rainier cherries and they are so sweet.

I’ll be making this again for the 4th of July.  What will you make?

Fresh Cherry Monkey Bread | Bakewell Junction - addicting and delicious

 Fresh Cherry Monkey Bread

Yield:  6 to 8 servings                Cook Time:  40 minutes

Ingredients:

Dough:

  • 2 tablespoons melted butter
  • 1 cup milk, warmed to 110 degrees
  • 1/2 cup water, warmed to 110 degrees
  • 1/4 cup sugar
  • 2 1/4 teaspoons instant yeast
  • 3 1/4 cups flour, plus extra for work surface
  • 2 teaspoons salt

Coating and Filling:

  • 1 to 1 1/2 packed brown sugar (I used 1 1/2 cups)
  • 2 teaspoons ground cinnamon
  • 8 to 12 tablespoons (1 to 1 1/2 sticks) butter, melted
  • 2 tablespoons Kirschwasser or cherry liquor
  • 40 large sweet fresh cherries plus more for snacking, pitted; 32 halved and 8 roughly chopped

Icing:

  • 4 ounces mascarpone cheese, softened
  • 4 tablespoons (1/2 stick) butter, softened
  • 1 1/2 cups powdered sugar
  • 1 teaspoon vanilla extract
  • 1/4 teaspoon ground cinnamon
  • 2 teaspoons Kirschwasser or cherry liquor
  • 1 teaspoon or more milk

Directions:

Step 1:  For the dough:  Mix the milk, water, melted butter, sugar and yeast in a two cup measure.  I used a microwave safe glass measure and heated the milk and water at full power for 1 minute, 20 seconds to reach 110 degrees.  In the bowl of a stand mixer, add the flour and salt.  Using the dough hook attachment, start the mixer on low.  Add the milk mixture slowly.  Scrape down the sides of the bowl as needed until the flour is incorporated.  Increase the mixer speed to medium (raised my KA to the 5 setting) and let it knead for another 6 to 7 minutes.  If the dough looks overly wet, add 2 tablespoons of flour at a time and continue mixing until the dough forms a mass.  Spray a large bowl with cooking spray.  Transfer the dough to the bowl and spray the dough also.  Cover the bowl with a clean dish towel and use my tip below to aid the rise.  Let the dough rise until doubled.  If using my tip, it will double in 45 to 60 minutes.  For this version of Monkey Bread, I let it rise for 60 minutes using my tip.  If not, it may take 1 to 2 hours.

Step 2:  For the coating:  As the dough rises, combine the brown sugar and cinnamon in a bowl.  Place the melted butter and Kirschwasser in a small bowl.  If you would like to dial back the sweetness and gooeyness of the recipe, use the lesser amounts of sugar and butter.  Set aside.  Pit and halve 32 cherries.  Pit and roughly chop 8 cherries.  My 40 cherries weighted .75 of a pound.

Step 3:  For the shaping the dough balls:  Sprinkle a clean work surface with flour.  Transfer the dough onto the floured surface.  Spread and press the dough into about an 8 inch square.  Cut the dough into 8 by 8 slices with a bench scraper or knife.  This will give you 64 pieces.  Shape each dough ball around half a sweet cherry and shape into balls and place back on the counter.  Repeat with the remaining dough balls.

Step 4:  Spray the bundt pan with cooking spray.  If any of the dough balls have reopened, pinch them together to fully enclose the cherry and create a uniform ball shape.  Dip each dough ball into the melted butter mixture individually and let excess drip back into the bowl.  Then roll them in the brown sugar mixture until they are well coated.  Place the dough ball into the bundt pan.  Layer the dough balls so they are offset and the dough ball on top is placed on the seam of dough balls below.  Repeat preparing the dough balls until about half are in the pan.  Sprinkle the chopped cherries on top of the dough balls.  Continue preparing the dough balls and layering them on top of the chopped cherries until they are all in the pan.  If there’s any remaining melted butter mixture or brown sugar, set aside.

Step 5:  Cover the bundt pan with a clean dish cloth or plastic wrap.  Let rise until puffy and until they are about an inch or two from the top of the pan.  Mine rose to the top of the pan.  If using my oven tip below, let rise for 50 minutes.  If not, let rise for 1 to 2 hours.  If there’s any remaining melted butter, drizzle it over the top of the dough balls.  If there’s any remaining brown sugar, sprinkle it over the top of the dough balls too.

Step 6:  Bake unwrapped 40 to 45 minutes in a preheated 350 degree oven with a cookie sheet underneath the pan.  I’ve found that at least one or two dough balls try to escape during baking and the cookie sheet prevents them from burning on the bottom of the oven and causing a ton of smoke.  This time I had many that escaped but the hubby loves these, so no harm done.  When done the top should be browned and the coating begins bubbling a bit.  Let bread cool in the pan for a maximum of 10 to 15 minutes.  Any longer and it may be difficult to depan.  Invert bread onto a large plate.

Step 7:  For the Icing:  While the dough cools to almost room temperature, add butter and mascarpone cheese to a large mixing bowl.  Beat 2 minutes.  I beat them on high using a hand-held mixer.  Beat in vanilla extract, Kirschwasser and cinnamon.  Mix in the powdered sugar at a lower speed (this prevents having powdered sugar everywhere).  Mix in the milk.  If you want a thinner icing, add more milk in teaspoon increments until you reach desired consistency.  Spread the icing on top of the bread – the icing will drizzle down the sides of the dough.  Serve warm or cold.

Enjoy!

Recipe inspired by Cooks Illustrated.

Tips:  If your house is chilly like mine always is and your dough doesn’t rise, you can boil a pot of water while preparing the dough and place the water and dough in a cold oven.  The boiling water will create a warm moist environment in the oven for the dough to rise well.  Leave the oven light on and it will add to the warming effect.  I use this tip even during the warm weather months.

This month, the #TwelveLoaves bakers are baking with CHERRIES!

Looking for a bread with cherries inspiration?  Check out these recipes by our very talented Twelve Loaves bakers:

#TwelveLoaves June:  Cherries.  The month of May was filled with lovely onion breads!  We have chosen cherries for our June theme.  Choose a recipe including cherries (fresh, dried, canned, jam, or preserves).  Whatever you bake, (yeasted, quick bread, crackers, muffins, braids, flatbreads, etc.) have fun and let’s have a delicious month of bread with cherries.  Let’s get baking!

#TwelveLoaves June:  Cherries

If you’d like to add your bread to the collection with the Linky Tool this month, here’s what you need to do!

  • When you post your Twelve Loaves bread on your blog, make sure that you mention the Twelve Loaves challenge in your blog post.  This helps us to get more members as well as share everyone’s posts.  Please make sure your bread is inspired by the theme.
  • Please link your post to the linky tool at the bottom of my blog.  It must be bread baked to the Twelve Loaves theme.
  • Have your Twelve Loaves bread that you baked this June, 2014, and posted on your blog by June 30, 2014.

#TwelveLoaves is a monthly bread baking party created by Lora from Cake Duchess.

#TwelveLoaves runs smoothly with the help of our friends. Thanks to the wonderful Renee Dobbs and Liz Berg for their help this month!

You are next… Click here to enter

This post may also be entered in these linky parties.  Click the here to visit the other great posts in the blog hops.

JWsMadeWLuvMondays

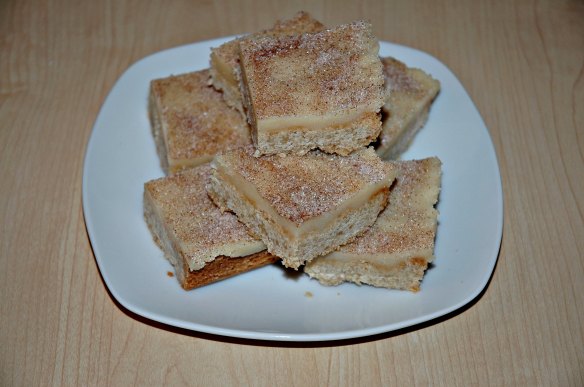
Snickerdoodle Cookie Dough Bars

Snickerdoodle Cookie Dough Bar | Bakewell Junction

Snickerdoodle Cookie Dough Bar | Bakewell Junction

Ugh!  I’ve lost another battle to the dandelions.  I was gaining on them this year because the weather was cooler for a while but then a couple of weeks ago we had three days of rain and a warm weekend – it was all over but the crying.  I’m not giving up entirely and will continue on my mission to pull all of them up in the front yard.  Hopefully this will put me in a better position for next year’s dandelion battle.  Wish me luck.

On to more dandilicious happenings…  I was debating whether I should post this recipe because I wanted to tweak it and bring you the revised version with double the cookie dough but time didn’t permit.  While this version is delicious, I am a cookie dough lover and feel that you can never have too much.  These bars a full of buttery goodness and although the cookie dough isn’t as sweet as the chocolate chip cookie dough I’ve had, it’s still quite yummy.  If you’re a fan of shortbread, this bar certainly has what you’re looking for too.  Feel free to leave the recipe as is, if you prefer to have more shortbread than cookie dough.  I will certainly double the cookie dough the next time I make them.  Which version would you prefer?

Have a great Memorial Day!

Snickerdoodle Cookie Dough Bar | Bakewell JunctionSnickerdoodle Cookie Dough Bars

Yield:  16 bars                 Cook Time:  30 minutes

Ingredients:

Shortbread:

  • 1 cup (2 sticks) butter, room temperature
  • 3/4 cup packed light brown sugar
  • 1 teaspoon coarse salt (I used Kosher salt)
  • 2 cups flour

Cookie dough:

  • 1/2 cup (1 stick) butter
  • 3/4 cup sugar
  • 1 tablespoon milk or cream
  • 1 teaspoon vanilla extract
  • 3/4 cup flour
  • 1/4 teaspoon salt

Topping:

  • 1/2 teaspoon ground cinnamon
  • 1 1/2 teaspoons sugar

Directions:

Step 1:  For the shortbread:  Cream together butter, brown sugar and salt in a large bowl on high speed for 3 minutes.  The mixture should look light and fluffy.  Scrape down the sides of the bowl, as needed.  Mix in 1/3 of the flour until combined using a low setting on your mixer.  Repeat for each of the remaining 1/3 additions.

Step 2:  Prepare an 8 inch by 8 inch baking pan by lining with aluminum foil and greasing with cooking spray.  Transfer the dough to the baking and press evenly across the pan.  Bake in a 350 degree preheated oven for 25 to 30 minutes.  The top should be golden brown.  When done, remove the pan from the oven and cool on a rack for 30 minutes.  Place the pan in the refrigerator or freezer to cool completely.

Step 3:  For the cookie dough:  In a medium sauce pan, melt the butter and sugar over medium heat.  Stir constantly until the butter is melted and the sugar has mostly dissolved.  This will help the cookie dough to have a less grainy mouth feel from the sugar.  The mixture will take on a custard-like look – this is okay.  Transfer the mixture to a medium mixing bowl, let cook for 15 minutes and then beat at a high speed for 2 to 3 minutes.  Add in the milk and vanilla and mix to combine.  Mix in the flour at a low speed until combined.  Spread cookie dough evenly on the completely cooled shortbread.  Using the back of a silicone spatula, smooth the top of the cookie dough for an even finish.

Step 4:  For the topping:  Combine cinnamon and sugar in a small bowl and sprinkle evenly across the top of the bars.  Place in the refrigerator for a few hours or overnight to set and cool completely.  Slice into 2 by 2 inch squares.

Enjoy!

Recipe adapted from love to be in the kitchen.

Tips:  Store in an airtight container in the refrigerator.  Liz from That Skinny Chick Can Bake always has perfectly cut cookie bars, so I used her Tip of the Day to cut the bars.

This post may also be entered in these linky parties.  Click the here to visit the other great posts in the blog hops.

JWsMadeWLuvMondays

Oreo Stuffed Monkey Bread

Oreo Monkey Bread | Bakewell Junction

Oreo Monkey Bread | Bakewell Junction

I have a bit of an obsession with Monkey Bread.  I love it and it’s just so easy to make.  This time I bring you Oreo Stuffed Monkey Bread.   I’ve seen Oreos stuffed in cookies, brownies, truffles and many other treats.  I like and appreciate all of those too but I wanted to incorporate the Oreos into my new favorite dessert.

Every bite of this Monkey Bread has Oreo in it.  I think you’ll love it as much as I do.  I used the mini Oreos in the recipe but Double Stuff Oreos are a favorite.  Next time I’ll use those cut into quarters.  What is your favorite Oreo?

Oreo Monkey Bread 2 | Bakewell Junction

Oreo Stuffed Monkey Bread

Yield:  6 to 8 servings                 Cook Time:  35 minutes

Ingredients:

Dough:

  • 2 tablespoons melted butter
  • 1 cup milk, warmed to 110 degrees
  • 1/2 cup water, warmed to 110 degrees
  • 1/4 cup sugar
  • 2 1/4 teaspoons instant yeast
  • 3 1/4 cups flour, plus extra for work surface
  • 2 teaspoons salt

Coating and Filling:

  • 1 to 1 1/2 packed brown sugar (I used 1 1/2 cups)
  • 2 teaspoons ground cinnamon
  • 8 to 12 tablespoons (1 to 1 1/2 sticks) butter, melted
  • 1 8 ounce bag of Mini Oreos or 16 Double Stuff Oreos quartered

Icing:

  • 4 ounces mascarpone cheese, softened
  • 4 tablespoons (1/2 stick) butter, softened
  • 1 1/2 cups powdered sugar
  • 1 teaspoon vanilla extract
  • 1/4 teaspoon ground cinnamon
  • 2 or more tablespoons milk

Directions:

Step 1:  For the Dough:  Mix the milk, water, melted butter, sugar and yeast in a two cup measure.  I used a microwave safe glass measure and heated the milk and water at full power for 1 minute, 20 seconds to reach 110 degrees.  In the bowl of a stand mixer, add the flour and salt.  Using the dough hook attachment, start the mixer on low.  Add the milk mixture slowly.  Scrape down the sides of the bowl as needed until the flour is incorporated.  Increase the mixer speed to medium (raised my KA to the 5 setting) and let it knead for another 6 to 7 minutes.  If the dough looks overly wet, add 2 tablespoons of flour at a time and continue mixing until the dough forms a mass.  Spray a large bowl with cooking spray.  Transfer the dough to the bowl and spray the dough also.  Cover the bowl with a clean dish towel and use my tip below to aid the rise.  Let the dough rise until doubled.  If using my tip, it will double in 45 to 60 minutes.  If not, it may take 1 to 2 hours.

Step 2:  For the coating:  As the dough rises, combine the brown sugar and cinnamon in a bowl.  Place the melted butter in a small bowl.  If you would like to dial back the sweetness and gooeyness of the recipe, use the lesser amounts of sugar and butter.  Set aside.

Step 3:  For the shaping the dough balls:  Sprinkle a clean work surface with flour.  Transfer the dough onto the floured surface.  Spread and press the dough into about an 8 inch square.  Cut the dough into 8 by 8 slices with a bench scraper or knife.  This will give you 64 pieces.  Shape each dough ball around an Oreo and shape into balls and place back on the counter.  Repeat with the remaining dough balls.

Step 4:  Spray the bundt pan with cooking spray.  If any of the dough balls have reopened, pinch them together to fully enclose the Oreo and create a uniform ball shape.  Dip each dough ball into the melted butter mixture individually.  Then roll them in the brown sugar mixture until they are well coated.  Place the dough ball into the bundt pan.  Layer the dough balls so they are offset and the dough ball on top is placed on the seam of dough balls below.  Repeat preparing the dough balls until they are all in the pan.  If there’s any remaining melted butter, drizzle it over the top of the dough balls.  If there’s any remaining brown sugar, sprinkle it over the top of the dough balls too.

Step 5:  Cover the bundt pan with a clean dish cloth or plastic wrap.  Let rise until puffy and until they are about an inch or two from the top of the pan.  Mine rose to the top of the pan.  If using my oven tip below, let rise for 45 minutes.  If not, let rise for 1 to 2 hours.

Step 6:  Bake unwrapped 30 to 35 minutes in a preheated 350 degree oven with a cookie sheet underneath the pan.  I’ve found that at least one or two dough balls try to escape during baking and the cookie sheet prevents them from burning on the bottom of the oven and causing a ton of smoke.  When done the top should be browned and the coating begins bubbling a bit.  Let bread cool in the pan for a maximum of 5 minutes.  Any longer and it may be difficult to depan.  Invert bread onto a large plate.

Step 7:  For the Icing:  While the dough cools a bit, add butter and mascarpone cheese to a large mixing bowl.  Beat 2 minutes.  I beat them on high using a hand-held mixer.  Beat in vanilla extract and cinnamon.  Mix in the powdered sugar at a lower speed (this prevents having powdered sugar everywhere).  Mix in the milk.  If you want a thinner icing, add more milk in teaspoon increments until you reach desired consistency.  While the bread is still warm, spread the icing on top of the bread – the icing will drizzle down the sides of the dough.  Serve warm or cold.

Recipe inspired by Cooks Illustrated.

Tips:  If your house is chilly like mine always is and your dough doesn’t rise, you can boil a pot of water while preparing the dough and place the water and dough in a cold oven.  The boiling water will create a warm moist environment in the oven for the dough to rise well.  Leave the oven light on and it will add to the warming effect.

This post may also be entered in these linky parties.  Click the here to visit the other great posts in the blog hops.

Strawberry Monkey Bread #TwelveLoaves

Strawberry Monkey Bread | Bakewell Junction

Strawberry Monkey Bread | Bakewell Junction

I was introduced to Monkey Bread a few months ago when I made it for the first time and it was for #TwelveLoaves too.  I thought a Strawberry version would be perfect for this month’s #TwelveLoaves bread baking party.  The monkey bread cooled overnight, since I was working on it late last night, so the icing didn’t melt and smooth out like I would have liked.

I wanted to incorporate strawberries in every bite of monkey bread, so I put a little in the center of each dough ball.  This version has strawberry mascarpone icing instead of cream cheese icing.  Hopefully this recipe and the slightly warmer weather reminds you of the coming spring.  If you like super gooey and sweet treats, this one is for you.  You can definitely taste the strawberries but it’s not overpowering.

Strawberry Monkey Bread 2 | Bakewell Junction

Strawberry Monkey Bread

Yield:  6 to 8 servings                 Cook Time:  35 minutes

Ingredients:

Dough:

  • 2 tablespoons melted butter
  • 1 cup milk, warmed to 110 degrees
  • 1/2 cup water, warmed to 110 degrees
  • 1/4 cup sugar
  • 2 1/4 teaspoons instant yeast
  • 3 1/4 cups flour, plus extra for work surface
  • 2 teaspoons salt

Coating and Filling:

  • 1 to 1 1/2 packed brown sugar (I used 1 1/2 cups)
  • 2 teaspoons ground cinnamon
  • 1 16 ounce container frozen strawberries, thawed and drained and liquid reserved
  • 8 tablespoons (1 stick) butter
  • 1/4 cup reserved frozen strawberry liquid

Icing:

  • 4 ounces mascarpone cheese, softened
  • 4 tablespoons (1/2 stick) butter, softened
  • 1 1/2 cups powdered sugar
  • 1 teaspoon vanilla extract
  • 1/4 teaspoon ground cinnamon
  • 2 or more tablespoons reserved frozen strawberry liquid or milk

Directions:

Step 1:  For the Dough:  Mix the milk, water, melted butter, sugar and yeast in a two cup measure.  I used a microwave safe glass measure and heated the milk and water at full power for 1 minute, 20 seconds to reach 110 degrees.  In the bowl of a stand mixer, add the flour and salt.  Using the dough hook attachment, start the mixer on low.  Add the milk mixture slowly.  Scrape down the sides of the bowl as needed until the flour is incorporated.  Increase the mixer speed to medium (raised my KA to the 5 setting) and let it knead for another 6 to 7 minutes.  If the dough looks overly wet, add 2 tablespoons of flour at a time and continue mixing until the dough forms a mass.  Spray a large bowl with cooking spray.  Transfer the dough to the bowl and spray the dough also.  Cover the bowl with a clean dish towel and use my tip below to aid the rise.  Let the dough rise until doubled.  If using my tip, it will double in 45 to 60 minutes.  If not, it may take 1 to 2 hours.

Step 2:  For the coating:  As the dough rises, combine the brown sugar and cinnamon in a bowl.  Place the melted butter in a small bowl and 1/4 cup reserved frozen strawberry liquid.  If you would like to dial back the sweetness and gooeyness of the recipe, use the lesser amounts of sugar and skip the 1/4 cup reserved strawberry liquid.  Set aside.

Step 3:  For the shaping the dough balls:  Sprinkle a clean work surface with flour.  Transfer the dough onto the floured surface.  Spread and press the dough into about an 8 inch square.  Cut the dough into 8 by 8 slices with a bench scraper or knife.  This will give you 64 pieces.  If there are any strawberries that haven’t been cleaned and the stem still remains, remove the stem.  I had two that were like this.  Flatten out the dough ball into a small square and rectangular shape and then pinch together dough ends, top to bottom corners.  This should create a well in the middle.  Place a small amount (about 1/4 teaspoon or less) of the defrosted strawberries in the center of the dough and then enclose in the dough by pinching the ends together.  Since the strawberries are moist keep a paper towel nearby, so you dry your hands and the dough will stick together better when pinching with dry hands.  Shape the dough into balls and place back on the counter.  Repeat with the remaining dough balls.

Step 4:  Spray the bundt pan with cooking spray.  If any of the dough balls have reopened, pinch them together to fully enclose the strawberry pieces and create a uniform ball shape.  Mix the butter mixture well and also periodically while dipping the dough balls.  Dip each dough ball into the melted butter mixture individually.  Then roll them in the brown sugar mixture until they are well coated.  Place the dough ball into the bundt pan.  Layer the dough balls so they are offset and the dough ball on top is placed on the seam of dough balls below.  Repeat until about half the dough balls are in the bundt pan.  Spread any remaining drained strawberries evenly on the dough.  Repeat preparing the dough balls until they are all in the pan and have covered all the strawberries.  If there’s any remaining melted butter or brown sugar, set aside.

Step 5:  Cover the bundt pan with a clean dish cloth or plastic wrap.  Let rise until puffy and until they are about an inch or two from the top of the pan.  Mine rose to the top of the pan.  If using my oven tip below, let rise for 45 minutes.  If not, let rise for 1 to 2 hours.  If there’s any remaining melted butter, drizzle it over the top of the dough balls.  If there’s any remaining brown sugar, sprinkle it over the top of the dough balls too.

Step 6:  Bake unwrapped 30 to 35 minutes in a preheated 350 degree oven.  When done the top should be browned and the coating begins bubbling a bit.  Let bread cool in the pan for a maximum of 5 minutes.  Any longer and it will be difficult to depan.  Invert bread onto a large plate.

Step 7:  For the Icing:  While the dough cools a bit, add butter and mascarpone cheese to a large mixing bowl.  Beat 2 minutes.  I beat them on high using a hand-held mixer.  Beat in vanilla extract and cinnamon.  Mix in the powdered sugar at a lower speed (this prevents having powdered sugar everywhere).  Mix in the reserved strawberry liquid or milk.  If you want a thinner icing, add more reserved strawberry liquid or milk in teaspoon increments until you reach desired consistency.  While the bread is still warm, spread the icing on top of the bread – the icing will drizzle down the sides of the dough.  Serve warm or cold.

Recipe inspired by Cooks Illustrated.

Tips:  If your house is chilly like mine always is and your dough doesn’t rise, you can boil a pot of water while preparing the dough and place the water and dough in a cold oven.  The boiling water will create a warm moist environment in the oven for the dough to rise well.  Leave the oven light on and it will add to the warming effect.

#TwelveLoaves March: Strawberries. February was a delicious month of Chocolate breads! We are ready for spring and chose Strawberries for our March theme! Choose a recipe featuring strawberries. (Your bread of choice could be accented with fresh or dried strawberries, strawberry preserves) Whatever you bake, (yeasted, quick bread, crackers, muffins, braids, flatbreads, etc) have fun and let’s have a delicious month of bread with STRAWBERRIES. Let’s get baking!

If you’d like to add your bread to the collection with the Linky Tool this month, here’s what you need to do!

1. When you post your Twelve Loaves bread on your blog, make sure that you mention the Twelve Loaves challenge in your blog post; this helps us to get more members as well as share everyone’s posts. Please make sure that your bread is inspired by the theme!

2. Please link your post to the linky tool at the bottom of my blog. It must be a bread baked to the Twelve Loaves theme.

3. Have your Twelve Loaves bread that you baked this March, 2014, and posted on your blog by March 31, 2014.

#TwelveLoaves is a monthly bread baking party created by Lora from Cake Duchess. #TwelveLoaves runs so smoothly thanks to the help of the lovely Renee from Magnolia Days and this month the fabulous Alice of Hip Foodie Mom.

You are next… Click here to enter

This post may also be entered in these linky parties.  Click the here to visit the other great posts in the blog hops.

Cinnamon Roll Cake

Cinnamon Roll Cake | Bakewell Junction

Cinnamon Roll Cake | Bakewell Junction

I’d seen this Cinnamon Roll Cake on Danielle’s Hugs and Cookies XOXO site a few weeks ago and thought it would be delicious.  Due to the frequent snow events and a couple of viruses I hadn’t had a chance to make it to share with family and friends.  It’s a pretty quick and easy recipe, so you can whip it up for last minute guests.  I love cinnamon rolls and was curious about how this cake would taste.

I almost didn’t post this recipe because my sense of taste is off thanks to this sinus thing I’ve got going on and the swirl wasn’t evenly distributed throughout (I need to work on the swirling technique).  The hubby walked by and grabbed a slice.  He liked it quite a bit so I changed my mind because it’s all about the flavor – right?

Cinnamon Roll Cake 

Yield:  12 servings                  Cook Time:  40 minutes

Batter:

  • 3 cups flour
  • 1 cup sugar
  • 1/4 teaspoon salt
  • 2 eggs
  • 2 teaspoons vanilla extract
  • 4 teaspoons baking powder
  • 1/2 cup butter, melted
  • 1 1/2 cups milk

Topping:

  • 1 cup butter, softened
  • 1 cup brown sugar
  • 2 tablespoons flour
  • 1 tablespoon ground cinnamon

Glaze:

  • 2 cups powdered sugar
  • 1 teaspoon vanilla extract
  • 5 tablespoons milk

Directions:

Step 1:  For the batter:  Line a 9 by 13 pan with parchment paper.  In a large bowl, add all the batter ingredients except the butter and mix with an electric mixer until combined.  Add the melted butter and stir slowly until combined.  Pour the batter into the prepared pan.

Step 2:  In a large bowl, add all the topping ingredients and mix until combined and creamy.  Drop large dollops of the topping evenly over the top of the cake.  Using a knife, swirl the topping throughout the cake.  Bake at 350 degrees for 35 to 40 minutes.  The cake is done when a toothpick inserted in the center comes out almost clean.

Step 3:  For the glaze:  In a medium bowl, mix together the glaze ingredients and drizzle over the cake while still warm.  Server at room temperature.

Storing:  Store at room temperature in a sealed plastic container for a few days.

Enjoy!!!

Recipe from Cinnamon Roll Cake on Hugs and Cookies XOXO.

This post may also be entered in these linky parties.  Click the here to visit the other great posts in the blog hops.

Chocolate Babka #TwelveLoaves March

Chocolate Babka #TwelveLoaves March | Bakewell Junction
Chocolate Babka #TwelveLoaves March | Bakewell Junction

Mmmm….  Look at those chocolate swirls.

Chocolate Babka #TwelveLoaves March 2 | Bakewell Junction
Chocolate Babka #TwelveLoaves March 2 | Bakewell Junction

Chocolate Babka is one of those things that I’ve wanted to try baking for several years.  I had printed a copy of the recipe I had seen on Smitten Kitchen and had it with all my other recipes (this was long before Pinterest became popular).  Thinking this would be a great recipe for #TwelveLoaves March which is featuring Holiday Breads, I decided to make it.

Babka in Polish means Grandmother and was traditionally made for Easter.  It was also a tradition in Lithuania, Slovakia, Belarus, Ukraine and Western Russia.  Another version of Babka (Chocolate Babka) is associated with Eastern European Jews.  The history behind Babka is a little confusing.  From what I’ve read on the internet, it’s debated as to who started the Babka tradition but it’s usually made around Easter.

This recipe contains a ton of butter and a ton of chocolate.  It is decadent, delicious and smells heavenly.  I would highly recommend breaking the Lenten fast with this sweet bread.  Although it takes a while to make this recipe, I had great results – my dough rose well and it was easy to roll out.  I did have one mishap because I don’t have three of the 9 by 5 loaf pans, so my attempt to put two of the loaves side by side in a half aluminum tray didn’t work out so well.  They were very dense and gooey in the middle but that didn’t alter the taste and they were devoured quickly anyway.  The only thing I would change for next time it to double the crumb topping recipe – you can never have too many crumbs.

Have you ever had Babka?  Which type do you prefer – chocolate filling, cinnamon filling, raisins, etc?

If you’re interested in additional Easter recipes that I make, try my Easter Bread or Prosciutto Bread (Lard Bread) recipes.  They’re delicious too.

Enjoy!

Chocolate Babka

Yield:  3 Loaves                  Cook Time:  70 minutes

Dough:

  • 1 1/2 cups milk, warmed to 110 degrees
  • 2 1/4 ounce packages active dry yeast or 4 1/2 teaspoons yeast
  • 3/4 cup sugar plus a another pinch
  • 2 large eggs at room temperature
  • 2 large egg yolks at room temperature
  • 6 cups flour plus more for dusting
  • 1 teaspoon salt
  • 1 cup (2 sticks) unsalted butter at room temperature plus additional for bowl and loaf pans (or you can use cooking spray instead of additional butter)

Egg Wash:

  • 1 egg at room temperature
  • 1 tablespoon heavy cream

Filling:

  • 2 1/4 pounds very finely chopped semisweet chocolate (I substituted a combination of Hershey’s and Lindt’s milk chocolate candy)
  • 2 1/2 tablespoons ground cinnamon
  • 1 cup sugar
  • 3/4 cup (1 1/2 sticks) unsalted butter at room temperature

Streusel Topping:

  • 1 2/3 cups powdered sugar
  • 1 1/3 cups flour
  • 3/4 cup (1 1/2 sticks) unsalted butter at room temperature

Directions:

Step 1:  Warm milk in the microwave to 110 degrees.  One minute and 25 seconds works in my glass 2 cup measure.  I used my candy thermometer to check the temperature.  If you are transferring to a small bowl, warm the bowl so the milk doesn’t cool.  Add the pinch of sugar and yeast to the milk and give a quick stir.  Set aside for about 5 minutes.  The mixture should become foamy.

Step 2:  Stir together 3/4 cup sugar, 2 eggs and yolks in a medium bowl.  Combine yeast and egg mixtures and mix thoroughly.

Step 3:  Add the flour and salt to the bowl of an electric mixer and give a quick stir.  Add the wet mixture to the flour and beat on low with the paddle attachment for about 30 seconds to combine.  Swap out the paddle attachment for the dough hook.  Cut 2 sticks of butter into 1 inch pieces and add to the dough.  Beat with the dough hook until butter is combined.  This will take approximately 10 minutes.  The dough will be soft and barely sticky.

Step 4:  On a clean work surface, lightly sprinkle some flour.  Place the dough on the floured surface.  You may need to scrape the bowl and dough hook to get every last bit of the wonderful dough.  Knead a minute or two.  Prepare a large bowl by buttering it or spraying with cooking spray.  Transfer dough to prepared bowl and turn to coat butter/cooking spray.  Cover bowl with plastic wrap.  Let dough rise in a warm spot for 1 hour to double in size.  My house is always cool so, while I prepare the dough, I boil a pot of water and place it in my oven along with the dough.  This creates a great environment for the dough to rise.

Step 5:  Filling:  Mix the chocolate, 1 cup sugar and cinnamon in a large bowl.  Cut in 1 1/2 sticks of butter using a pastry cutter until you have a homogeneous mixture.

Step 6:  Egg wash:  In a small bowl, beat egg and heavy cream together.

Step 7:  Butter the loaf pans or spray with cooking spray then line with parchment paper. Punch down the dough and wait for 5 minutes before cutting into thirds.  Cover resting dough while working with the first piece of dough.  Flour the work area.  Roll the first piece of dough until it’s about 1/8 inch thick.  It should be about 16 by 16 inch square.

Step 8:  Using the egg wash, moisten the edges of the rolled dough.  Evenly crumble 1/3 (about 2 1/2 cups) of the chocolate mixture minus 2 tablespoons on rolled dough up to about 1/4 inch from the edge of the dough.  Beginning at one side of the dough, roll the dough up until you reach the opposite side.  Pinch the dough together to seal the edges.  The dough needs to be twisted along its length 5 or 6 times.  Moisten the top of the rolled dough with the egg wash.  Sprinkle 2 tablespoons of the chocolate mixture on half the roll and press into the dough.  Fold the side of the dough roll without the chocolate mixture onto the side with the chocolate mixture.  Seal edges by pinching.  Twist the roll twice and place in loaf pan.  Repeat rolling dough through placing in loaf pan for each of the other doughs.

Step 9: Streusel Topping:  Add powdered sugar, flour and butter in a large bowl.  Mix to combine and create small to large crumbs.

Step 10:  Preheat oven to 350 degrees.  Loosely cover with plastic wrap and let doughs rise for 20 to 30 minutes in a warm spot.  Moisten the tops of the loaves with the egg wash.  Sprinkle the top of each loaf with 1/3 of the streusel.

Step 11:  Place loaves in preheated oven and bake 55 minutes until golden, rotating loaves midway during baking.  Lower temperature to 325 degrees and bake another 15 to 20 minutes until loaves are darker golden.  Cool completely on wire racks.  Depan loaves and try not to eat an entire loaf.

Storing:  Store loaves in a sealed plastic container or covered with plastic wrap.

Tips:

  • To finely chop the chocolate easily, break it up into inch size pieces initially.  In small batches, use a food processor or mini chopper to chop it finely.
  • The dough can be frozen for 1 month after preparing up to the point where they are ready to be placed in the oven.  Remove the dough from the freezer and wait 5 hours before baking.
  • If your house is chilly like mine always is and your dough doesn’t rise, you can boil a pot of water while preparing the dough and place the water and dough in a cold oven.  The boiling water will create a warm moist environment in the oven for the dough to rise well.

Enjoy!!!

Recipe from Smitten Kitchen, originally from Martha Stewart.

TWELVE2520LOAVES255B4255D
What is baking this March in the TwelveLoaves kitchens? Holiday Breads!

#TwelveLoaves March:  Holiday Bread.  Bake a bread, yeast or quick bread, loaf or individual.  This #TwelveLoaves is all about the incredible holiday breads featured in March.  Do you have a favorite Easter or St. Patrick’s Day Bread?  We would love to see it.  Let’s get baking!

Look at what our very talented #TwelveLoaves bakers have created this March!

We would love to have you join our #TwelveLoaves group; it’s easy!
1.  When you post your Twelve Loaves bread on your blog, make sure that you mention the Twelve Loaves challenge in your blog post; this helps us to get more members as well as share everyone’s posts.  Please make sure that your Bread is inspired by the theme!
2.  Please link your post to the linky tool at the bottom of Lora’s blog (Cake Duchess) or the link below.  It must be a bread baked to the Twelve Loaves theme.
3.  Have your Twelve Loaves bread that you baked this March, 2013 posted on your blog by March 31, 2013.

You are next… Click here to enter

Follow @TwelveLoaves on Twitter

See what’s freshly baked for #TwelveLoaves on the growing Pinterest board.

This post may also be entered in the following linky party. Click the button below to see the other great posts in the blog hop.

Foodie Friends FridayBWS tips buttonSweet 2 Eat BakingThe Best Blog Recipes

Spatulas On Parade

Pfeffernusse Cookies

Pfeffernusse | Bakewell Junction

Pfeffernusse | Bakewell Junction

This week I’m sharing a recipe that reminds me of the Pfeffernusse that my sisters and I loved from Stella D’Oro.  The company is still around but it’s been sold at least once and they no longer make Pfeffernusse or at least I can’t find them.  There are other cookies that we remember fondly but I haven’t found recipes for those yet.

Pfeffernusse (which means pepper nut) are a lightly spiced cookie that’s quite delicious.  Be sure to coat with powdered sugar, since the dough isn’t very sweet.  It’s a great bite-sized treat.

Pfeffernusse

Yield:  75 cookies                  Cook Time:  10 – 15 minutes

  • 2 cups plus 2 tablespoons flour
  • 3/4 teaspoon baking powder
  • 1/8 teaspoon baking soda
  • 1/4 teaspoon salt
  • 1/4 teaspoon ground black pepper
  • 1/4 teaspoon ground cloves
  • 1 1/4 teaspoons ground cinnamon
  • 1/4 teaspoon anise seeds
  • 1/2 cup (1 stick) butter or vegetable shortening
  • 1/3 cup sugar
  • 1 egg
  • 1/4 cup finely chopped blanched almonds
  • 1/3 cup molasses
  • 1 tablespoon honey
  • 1/3 cup brandy
  • 1 teaspoon grated lemon rind
  • 1 tablespoon lemon juice
  • 2/3 cup powdered sugar for coating

Directions:

Step 1:  Mix together flour, baking powder, baking soda, salt, black pepper in a medium bowl.  Add the cloves, cinnamon and anise seeds to the flour mixture and set aside.

Step 2:  In a large mixing bowl, cream together butter and sugar with an electric mixer.  Add the egg and beat well until light.  Beat in the almonds.  The flour mixture will be added to the butter mixture in three additions, alternating with the remaining ingredients.  Mix in the molasses; then mix in 1/3 of the flour mixture; then mix in the brandy; then mix in 1/3 of the flour mixture; then mix in the honey and lemon rind; then mix in the rest of the flour mixture; finally mix in the lemon juice.  Beat well.  Cover mixture with plastic wrap and refrigerate overnight.

Step 3:  Preheat oven to 350 degrees.  Prepare cookie sheet by covering it with parchment paper or cooking spray.  Shape dough into 1 inch balls and place at least 1 inch apart on the cookie sheet and bake for 10 to 15 minutes.

Step 4:  Place powdered sugar in a small bowl.  While cookies are still warm, roll in powdered sugar until well coated.

Storing:  Store cookies in a sealed plastic container.

Enjoy!!!

Recipe from Barbara Grunes’ Joy of Baking cookbook.

This post may also be entered in the following linky party. Click the buttons below to see the other great posts in the blog hop.

Foodie Friends Friday

12 Weeks of Christmas Treats ~ Week 9 ~ Apple Pie with Crumb Topping

Apple Crumb Pie by Bakewell Junction

Apple Crumb Pie by Bakewell Junction

It’s the ninth week of the 12 Weeks of Christmas Treats blog hop hosted by Brenda Thompson from MealPlanningMagic.com.  If you’d like to join us, please fill out the form on Brenda’s blog.

Today I’m sharing an Apple Pie recipe that I’ve been trying to perfect for a while.  I like to use Honeycrisp apples because they have a lot of flavor, are very juicy and give the pie an awesome aroma. Once I attempted a pie recipe that said it was the best apple pie but I was disappointed because there were too many apples for each slice.  The recipe called for 4 1/2 pounds of apples sliced in thin slivers which made the pie very dry as there was no room for the pie juices.

One of the problems I’ve had with my current apple pie recipe is that apples take a long time to become fork tender, so I’ve modified the recipe to incorporate the Honeycrisp apples.  Another issue I’ve had is with pie crusts, so I’ve taken to only having a bottom crust and crumbs for the topping.  The crumb topping is very tasty but I still need a good crust for the bottom.  I happened to see a tutorial to make flaky pie crust on Annalise’s site Completely Delicious.  This is the first time I used the recipe and I’m confident that it will be a hit.  Annalise’s tutorial is detailed and very helpful to those of us who are pie crust challenged.  You should check it out on her site.  I was debating whether to share this recipe with you because my crust shrunk a little during baking, although this doesn’t affect the delicious flavor and aroma.  I thought the shrinking wouldn’t happen this time but I figured out that it was because the crust warmed up when I rolled it and pie was sitting on the counter while the oven was heating up, so I added some additional chilling/resting time before and after filling the pie this way you won’t have the same thing happen to you.

This pie will be for Thanksgiving but I think it’s a great addition to any Christmas treat table.  Since this post is published before Thanksgiving, I’ll have to update it later with a single slice of the pie after we dig in on Thursday.

Dig in.

Apple Crumb Pie by Bakewell Junction

Enjoy.

Apple Pie with Crumb Topping

Yield:  1 9 inch pie                  Cook Time:  100 minutes

Crust

  • 2 1/2 cups flour
  • 1 tablespoon sugar
  • 1 teaspoon salt
  • 1 cup (2 sticks) unsalted butter, cold and cut into cubes
  • 1/2 cup buttermilk, cold (substituted 1 1/2 teaspoons lemon juice and enough milk to come up to 1/2 cup)
  • 1-2 tablespoons vodka or water, cold (substituted rum because I was out of vodka)
  • 1 egg (I use extra large)

Filling

  • 1 cup (packed) golden brown sugar
  • 3 tablespoons all purpose flour
  • 2 teaspoons finely grated lemon peel (substitution 2 teaspoon lemon juice)
  • 1 1/4 teaspoons ground cinnamon
  • 2 3/4 pounds Honeycrisp apples (about 6 medium), peeled, halved cored, cut into 1/4 inch thick slices and then 1/3 inch chunks (about 8 cups) (can use yellow-skinned ripe Golden Delicious)
  • 2 teaspoons vanilla extract

Crumb Topping

  • 1 cup all purpose flour
  • 1/2 cup (packed) golden brown sugar
  • 1 teaspoon ground cinnamon
  • 1/8 teaspoon salt (I used Kosher salt)
  • 1/2 cup (1 stick) chilled unsalted butter, cut into 1/2-inch cubes

Garnish

  • Whipped Cream (optional)
  • Vanilla Ice Cream (optional)

Directions:

Step 1:  For the crust, use 1/2 the recipe stated for one bottom pie crust.  Add flour, sugar, and salt in a medium bowl.  Add butter and coat with the flour mixture.  Pour the mixture onto a work surface.  Using a rolling pin, roll the flour and butter mixture into thin sheets until the butter is combined with the flour.  Gather the mixture back into a pile and scrape the rolling pin as necessary.  When done the mixture will look flaky.  Move the mixture to the bowl and freeze for 15 minutes.

Step 2:  After the mixture is chilled, add the buttermilk.  Stir mixture with a spoon until it forms a ball.  You may need to do some of the stirring by hand.  Shape dough into a flat disc.  Wrap in plastic wrap and refrigerate for an hour or overnight (will keep for up to three days).

Step 3:  To roll out the refrigerated dough, let it sit for five minutes in your workspace.  Place the chilled dough onto a lightly floured surface and roll to 1/4 inch thick with a floured rolling pin.  The rolled dough should be about 13 inches in diameter.  Use your rolling pin to lift and move the pie crust to your 9 inch deep dish pie plate.  Cut off any excess dough.  Fold under any extra dough and crimp to have a nice finish.  Place the pie plate in the refrigerator for at least an hour until the filling is ready.

Step 4:  For the filling, mix brown sugar, flour, lemon peel, and cinnamon in large bowl.  Add apple slices, and vanilla.  Mix until well coated.  Move the mixture to a stock pot and begin heating on medium for about 10 minutes.  When the mixture begins bubbling, turn it down to low and cook for another 20 to 30 minutes until the apples are fork tender.  Let the mixture cool to about room temperature.

Step 5:  Transfer filling to unbaked crust but remove about 1 cup of filling juices and let filling mound slightly in the middle.  Place the filled pie in the refrigerator for at least an hour.  Preheat the oven to 375 degrees.  Bake for 40 minutes with aluminum underneath to catch drippings.

Step 6:  In the interim, prepare the topping.  Mix flour, sugar, cinnamon and salt in a bowl.  Mix butter into the flour mixture with finger until clumps begin to form.

Step 7:  Remove pie from the oven and sprinkle topping on the pie.  Return pie to the oven and bake for another 20 minutes.

Step 8:  Remove pie from oven and let cool on rack for at least two hours.

Tips:  To make flaky pie crusts it helps to chill butter and flour before using.  Follow Annalise’s tutorial on Completely Delish.

Storing:  Store baked pie in sealed plastic wrap.  You can freeze the unbaked pie and put it directly into the oven provided it isn’t in a glass or ceramic pie plate.

Enjoy!!!

Filling and crumb recipe adapted from Bonappetit posted by Chris Hall.
Crust recipe from Completely Delish

Have a look at the other great cookies in the blog hop by clicking on the Linky Tools link below.  Sorry my blog doesn’t support the blog hop participant icons directly.

12 Weeks of Christmas Treats Blog Hop

Week 9, November 21, 2012

Powered by Linky Tools

Click here to enter your link and view this Linky Tools list…


I’ve seen some of the other bloggers that participate in the 12 Weeks of Christmas Treats listing their submissions from the prior weeks.  I like this idea, so I’ve incorporated it into this week’s post.  If you’ve missed my posts for the prior weeks, here’s a reminder:

This post was also entered in the following linky party.  Click the button below to see the other great posts in the blog hop.

Sweet 2 Eat Baking

12 Weeks of Christmas Treats ~ Week 4 ~ Giant Ginger Cookies

It’s the fourth week of the 12 Weeks of Christmas Treats blog hop hosted by Brenda Thompson from MealPlanningMagic.com.  If you’d like to join us, please fill out the form on Brenda’s blog.

Most of my Christmas treats are cookies.  Hopefully you don’t mind this.  This week I’d like to share a recipe that I got from a magazine that a friend of mine gave me a couple of years ago – Better Homes and Gardens Ultimate Cookies & Bars magazine.  I added the Giant Ginger Cookies to my Christmas cookie list and made them last year.  They were a hit.  My husband has always hated gingerbread cookies but even he said that these are really good.

Now I wouldn’t really consider these cookies giant – I reserve that for the cookies that are the size of a dinner plate – but they are larger than the average cookie (about the size of a coaster) and pretty thick too.  The demerara sugar coating gives the cookies great added texture.  Ginger cookies always remind me of the holidays and they are a staple for most everyone.

Enjoy.

Giant Ginger Cookies

Yield:  24 cookies                  Cook Time:  11 – 13 minutes

Ingredients

  • 4 1/2 cups flour
  • 4 teaspoons ground ginger
  • 2 teaspoons baking soda
  • 1 1/2 ground cinnamon
  • 1 teaspoon ground cloves
  • 1/4 teaspoon salt
  • 1 1/2 cups shortening (I used Crisco Baking Sticks)
  • 2 cups sugar
  • 2 large eggs
  • 1/2 cup molasses
  • 3/4 cups Demerara, turbinado or granulated sugar

Directions:

Step 1:  Preheat oven to 350 degrees.  Line two cookie sheets with parchment paper and set aside.

Step 2:  Combine flour, ginger, baking soda, cinnamon, cloves and salt in a separate bowl and set aside.

Step 3:  Using an electric mixer on medium to high speed beat shortening in a large bowl for 30 seconds.  Scrape the sides of the bowl as you go when necessary.  Beat in the 2 cups of sugar.  Combine eggs and molasses into the mixture.  Beat in as much of the flour mixture as possible.  Finish combining the remaining flour using a spatula.

Step 4:  Add the demerara sugar into a small bowl.  Roll dough into 2 inch balls using a 1/4 cup measure or ice cream scoop.  Coat with coarse sugar by rolling in the small bowl.  Place 2 1/2 inches apart on the parchment lined cookie sheet (or ungreased cookie sheet).

Step 5:  Bake for 11 to 13 minutes or until bottoms are lightly browned and tops are puffed slightly.  Cool cookie on racks for 2 minutes.  Remove the cookies from the pans and let cool completely on cooling racks.

Tips:  Do not bake cookies too long.  Sometimes it’s a bit annoying to measure shortening using the water displacement method, so this time I used Crisco Baking Sticks which are softer than regular shortening and are as easy to use as butter, since they are shaped like a stick and have the measurements similar to the way they are on a stick of butter.

Storing:  Store cookies in a sealed plastic container.  The cookies are fine for several days when stored this way.  Freeze up to three months.  Do not store with cookies that aren’t spiced as the other cookies will take on the flavors of these cookies.

Enjoy!!!

Barely adapted from Better Homes and Gardens Ultimate Cookies and Bars magazine.

Have a look at the other great cookies in the blog hop by clicking on the Linky Tools link below.  Sorry my blog doesn’t support the blog hop participant icons directly.

12 Weeks of Christmas Treats Blog Hop

Week 4, October 18, 2012

Powered by Linky Tools

Click here to enter your link and view this Linky Tools list…